In this tutorial, you will learn how to install WordPress on Bluehost, a popular website hosting provider since 2003.
Installing WordPress on a new web hosting environment is sometimes difficult for beginners. That’s why I’ve decided to guide you step by step on how to install WordPress on Bluehost hosting from scratch.
Bluehost provides you with easy steps to install WordPress and you don’t need to be a coding expert.
Bluehost is the top-recommended hosting provider by WordPress.org. Bluehost provides you Free Domain, Free SSL, 1-click WordPress Install, and 24×7 Support.
Step by Step Guide on How to Install WordPress on Bluehost
This tutorial on setting up WordPress in a Bluehost hosting environment contains three steps. You need to read and follow each of these steps to successfully host a WordPress website on Bluehost.
1. Choose a Plan
To get your domain and host your website you need to visit the Bluehost Website in the new browser and then click on the green button “GET STARTED”.

On the next screen, you will see various hosting plans starting from the basic plan to other premium plans.
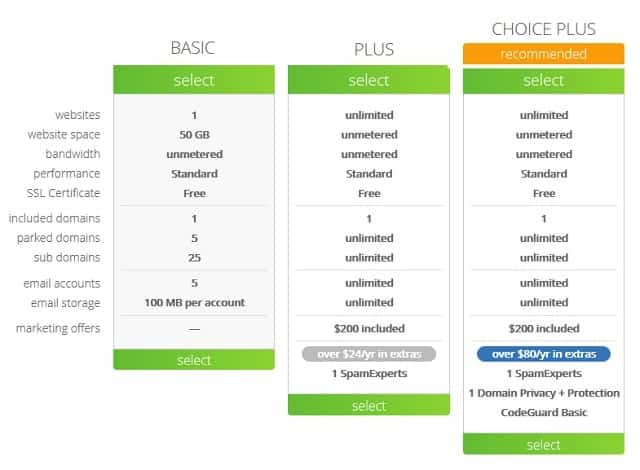
Select the plan you need and click on continue.
Now you will be asked to choose your free domain. There are many options to choose from .com, .net, .org, and others. You should choose a domain name that is easy to remember and related to your business.
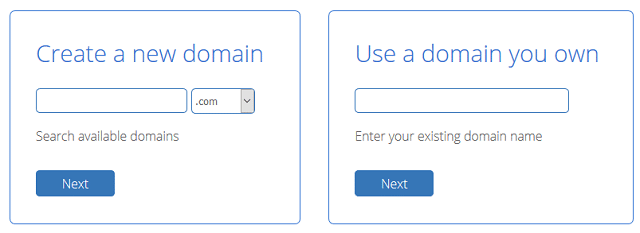
After choosing a domain you can click on next.
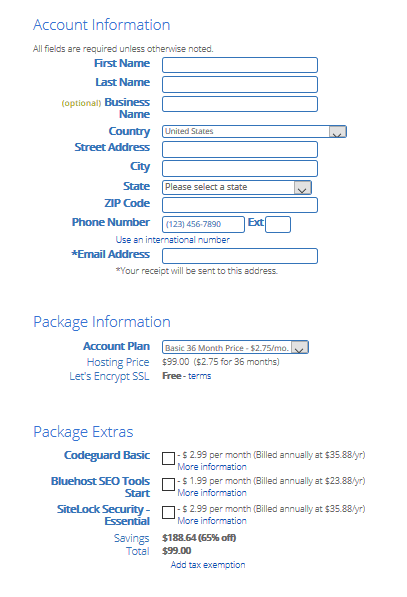
Now you will be asked to fill in your basic details like; name, email, address, etc. On the page, you will also see your package information and extras. We will recommend you avoid purchasing any extra packages right now because, if needed you can purchase them later.
2. Install WordPress
After the completion of the registration, you might be redirected to the login page of your Bluehost account.
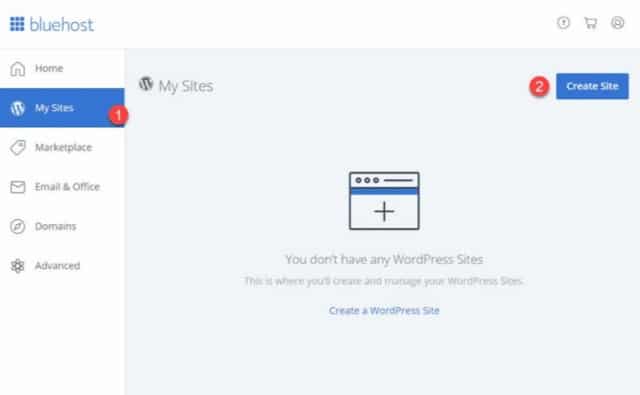
From your Bluehost account dashboard, you can use “My Sites” to create a WordPress site.
You will be asked to select the domain for the WordPress installation. After clicking on the next or continue button you should enter your site name, details, username, and password.
After the installation is completed you will see a success message with your site login details. You should save these details in a safe place.
You can now login to your WordPress website by visiting this address http://www.yoursiteaddress.com/wp-admin and using the username and password details you entered earlier.
3. Basic WordPress Customization
After login into your WordPress website, you can customize it by changing your theme from the Appearance > Themes option.

There are thousands of themes that are available on WordPress, just select the one you like and click install to apply the theme to your website.
You have successfully created your website using WordPress. If you have any questions about the WordPress website creation process you can mention them in the comment below.
FAQ: Installing WordPress on Bluehost
Q. What do I need to create and run a WordPress website successfully on Bluehost?
You need to get the Domain and Web Hosting from Bluehost to run a WordPress site.
Q. How much time it will take to set up a WordPress website on Bluehost?
To set up and successfully run a WordPress website on Bluehost it needs 30 minutes of your time.
Q. How much does it cost to host a WordPress website on Bluehost?
To run a standard WordPress website on Bluehost it will cost you about $100 per year.